Is your Start menu getting so cluttered you can’t find anything? The All Programs section of the Start menu may be in alphabetical order (sometimes by company names rather than program names), but would you rather have it categorized?
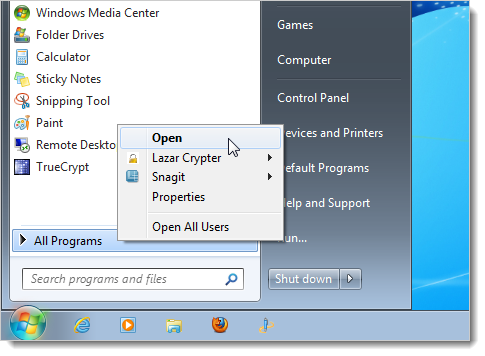
There is an easy way to organize the All Programs section of the Start menu without using third-party software. To manually organize your Start menu, click on the Start orb, right-click on All Programs and select Open from the popup menu. This opens the folder containing program shortcuts for the currently logged in user only.
If you want to open the folder containing program shortcuts for all users, select Open All Users from the popup menu. We recommend you open both folders because the All Programs section of the Start menu is created from the shortcuts in both folders.

The Programs folder contains all the shortcuts listed when you select All Programs on the Start menu. Open the Programs folder for both the current user and for all users. To organize the shortcuts, copy and move existing shortcuts, delete shortcuts and folders and add new shortcuts as desired. You can create new folders in the Programs folder for categories, such as Office, Graphics, Browsers, etc. and put your shortcuts into these folders.

Here’s our Start menu categorized and sorted alphabetically automatically within each category (or folder).

It’s much easier to find programs on an organized Start menu. As you install programs, just repeat this process to categorize the new programs and keep your Start menu clean and organized.
No comments:
Post a Comment